UI Based
Introduction 
What is it 
UI Based Monitoring is a comprehensive technique and solution designed to assess the performance and availability of applications or services. By simulating real user interactions, this monitoring approach ensures that all system components function correctly and efficiently from start to finish.
Comparing with other monitoring approaches like API monitors, metrics/logs-based monitoring etc, UI Based Monitor can offer a holistic view by validating the workflow from the user's perspective. This user-centric approach ensures that every component works harmoniously in real-world scenarios, which might not be captured through traditional white-box monitoring techniques that require knowledge of the internal workings of the system.
In contrast, simulating UI Based Monitor is often classified as black-box testing, where the internal structure is not known to the tester. Black-box monitoring assesses the system's external behavior, which is crucial for understanding the actual user experience.
This solution is powered by Appium/OCR/OpenCV, which is capable of handling automated tests for both web browsers and desktop applications.
Example: Webex Application 
Imagine you are responsible for ensuring a seamless user experience on the Webex Application, both on desktop and web browser. To achieve this, you implement E2E UX Monitoring. Here's how it works:
- Start/Join Meeting Simulation: - Desktop Application: - The monitoring tool simulates a user starting a new meeting from the desktop application. - It checks the meeting creation process, response times, and any error messages. - Next, it simulates a user joining the meeting using another application user. - It verifies the joining process, waiting room functionality, and connection stability. - Web Browser: - The tool simulates a user starting a new meeting from the web browser. - It monitors the web interface for responsiveness, meeting URL generation, and any issues encountered. - Then, it simulates a user joining the meeting via the web browser. - It checks the joining process, browser compatibility, and overall user experience.
- Send Message in Webex App: - Desktop Application: - The tool simulates sending a chat message during the meeting from the desktop application. - It verifies the message delivery, display in the chat window, and any potential delays.
Benefits 
- Performance Insights: Identifies slow response times and bottlenecks during critical user interactions like starting/joining meetings, sending messages, and closing meetings.
- Availability Assurance: Ensures that all components of the Webex Application, both on desktop and web browser, are operational and accessible.
- User Experience Optimization: Detects and resolves issues before they impact real users, providing a smooth and efficient meeting experience.
High Level Workflow 
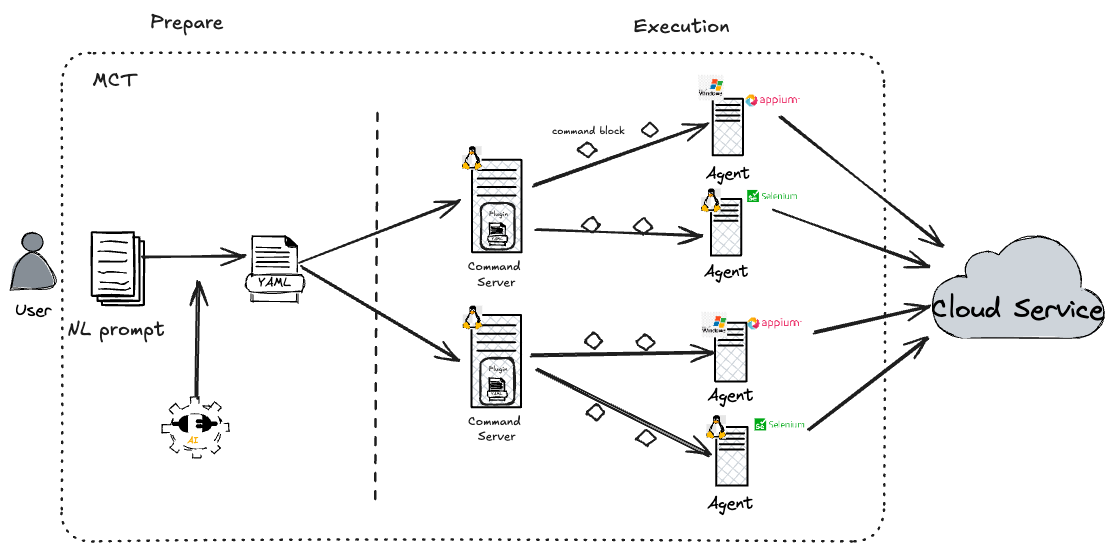
Installation 
Command Server (Linux)
- Install xfreerpd: This tool is used to establish a remote desktop connection, allowing the Command Server to interact with the Agent Server's graphical interface over a network.
- Install x11-unix: This package provides the necessary X11 libraries and utilities for Unix-like systems, enabling the use of X Window System protocols for graphical display.
Agent Server (Windows)
- Install Appium: Ensure Appium server is installed on each Agent Server to facilitate the execution of Appium actions.
- Install ffmpeg: Install ffmpeg on each Agent Server to enable video recording capabilities for monitoring and debugging purposes.
- Install Tesseract: Install Tesseract OCR engine on each Agent Server to support text recognition and extraction from images and videos.
Steps 
1. User Input: 
Users write behavior flows using natural language to describe the desired sequence of actions.
Exmaple to perform sending message in Webex App:
Click on the plus sign next to the search box
Click the "send a message" button in the dropdown list
Type "Me and Bots" in the "Add people" input box
Press enter
Examine the title of the chat window is "Me and Bots"
Type "Hello World" in the message input box
Click the send button
If behavior flow of case is too complicated to be written in description prompts, optional approach is to provide an mp4 files to tell the successful behavior flow case. MCT engineers will help generate the flow to scripts
2. Conversion to Structured Format: 
Upon submission of the behavior flow description file (NL scripts or mp4 video) accompanied by configuration items, our backend AI powered service will transform them into automation scripts capable of executing on a desktop screen. Additionally, executable scripts will be generated for MCT to execute all the steps. The entire execution process will be recorded as evidence to verify the successful execution of the cases.
Example:
version: 1
actions:
- action: click
  target: plus sign next to the search box
  description: Click on the plus sign next to the search box
  target_locator:
    by: xpath
    value: "/XCUIElementTypeApplication[@title='Webex']/XCUIElementTypeWindow[@identifier='main_window'][@title='Webex']/XCUIElementTypeMenuButton[@identifier='WTGlobalPlusButton'][@label='Start
      a conversation, call, or meet']"
- action: click
  target: '"send a message" button in the dropdown list'
  description: Click the "send a message" button in the dropdown list
  target_locator:
    by: xpath
    value: "/XCUIElementTypeApplication[@title='Webex']/XCUIElementTypeWindow[@identifier='main_window'][@title='Webex']/XCUIElementTypeMenuButton[@identifier='WTGlobalPlusButton'][@label='Start
      a conversation, call, or meet']/XCUIElementTypePopover/XCUIElementTypeScrollView/XCUIElementTypeTable[@label='Start
      a conversation, call, or meet']/XCUIElementTypeTableRow/XCUIElementTypeCell//XCUIElementTypeOther[@identifier='UTListTableCellView'][@title='Send
      a message']/.."
- action: input
  target: '"Add people" input box'
  text: Me and Bots
  description: Type "Me and Bots" in the "Add people" input box
  target_locator:
    by: xpath
    value: "/XCUIElementTypeApplication[@title='Webex']/XCUIElementTypeWindow[@identifier='main_window'][@title='Webex']/XCUIElementTypeSplitGroup[@identifier='_NS:81']/XCUIElementTypeSplitGroup[@identifier='integratedSessionSplitView']/XCUIElementTypeGroup[@identifier='_NS:37']/XCUIElementTypeSearchField[@identifier='_NS:11']"
- action: press_key
  keycode: XCUIKeyboardKeyReturn
  description: Press enter
- action: wait_for_element
  target: title of the chat window is "Me and Bots"
  timeout: 5
  description: Examine the title of the chat window is "Me and Bots"
  target_locator:
    by: xpath
    value: "/XCUIElementTypeApplication[@title='Webex']/XCUIElementTypeWindow[@identifier='main_window'][@title='Webex']/XCUIElementTypeSplitGroup[@identifier='_NS:81']/XCUIElementTypeSplitGroup[@identifier='integratedSessionSplitView']/XCUIElementTypeGroup[@identifier='_NS:37']/XCUIElementTypeGroup[@identifier='WTRoomHeader'][@label='Me
      and Bots']/XCUIElementTypeButton[@identifier='ConversationTitle']"
- machine: A
  action: input
  target: message input box
  text: Hello World
  description: Type "Hello World" in the message input box
  target_locator:
    by: xpath
    value: "/XCUIElementTypeApplication[@title='Webex']/XCUIElementTypeWindow[@identifier='main_window'][@title='Webex']/XCUIElementTypeSplitGroup[@identifier='_NS:81']/XCUIElementTypeSplitGroup[@identifier='integratedSessionSplitView']/XCUIElementTypeGroup[@identifier='_NS:37']/XCUIElementTypeGroup[@identifier='_NS:11']/XCUIElementTypeScrollView[@identifier='Spark
      Text View']/XCUIElementTypeTextView[@identifier='ConversationInputTextView']"
- action: click
  target: send button
  description: Click the send button
  target_locator:
    by: xpath
    value: "/XCUIElementTypeApplication[@title='Webex']/XCUIElementTypeWindow[@identifier='main_window'][@title='Webex']/XCUIElementTypeSplitGroup[@identifier='_NS:81']/XCUIElementTypeSplitGroup[@identifier='integratedSessionSplitView']/XCUIElementTypeGroup[@identifier='_NS:37']/XCUIElementTypeGroup[@identifier='_NS:11']/XCUIElementTypeButton[@label='Send
      Message']"
3. Command Distribution: 
The MCT Command Server (running on Linux) processes the YAML file, breaking down the steps into executable command blocks.
The Command Server then assigns these specific steps to remote Agent Servers (running on Windows) with execution sequence.
4. Action Execution: 
Upon receiving the command blocks, each Agent Server executes the specified actions using Appium by sending requests to the locally installed Appium service.
To optimize compute resource usage and enhance flexibility for environment dependencies, we also utilize Selenium for browser-only test cases. This approach reduces the reliance on Windows-based execution and leverages Linux environments, providing a more efficient and scalable testing infrastructure.
5. Response Handling: 
After completing each action, the Agent Server sends a response back to the MCT Command Server.
The Command Server processes the response and determines the next step in the workflow.
6. Result Generation: 
After all steps in YAML file executed, results will be recorded in MCT database, and all the details could be found in MCT Portal
All the execution steps will be visualy recorded as mp4 video, and failure will be captured with screenshots as well.
By following this workflow, the system ensures seamless execution of user-defined behavior flows, leveraging Appium for automated interaction with applications, and providing a robust framework for end-to-end user experience monitoring.